Showing posts with label moda. Show all posts

Wednesday, February 10, 2016

Quilts for brothers (1)

When our friends moved away, I made quilts for their boys as a special memory to take with them, to remember us from time to time. The boys used to share one bedroom so I wanted to make similar quilts, matching in colour but not strictly in design.


I chose low volume grey and white-ish prints and accent fabrics in blue, green, dark grey and turquoise and started sewing 4 strips together. Out came my 90° ruler and I cut striped triangles from each 4-strip-set.

 
Then the fun pain of trying out different layouts began... I opted for a giant arrow, diagonal rows, chevrons and diamonds. Which one do you like best?!
 
 
Once I decided on the design (Diamonds, because it matched my choise for his brother's quilt best), I started sewing the blocks together. Trying to match those points and cursing when the bulky seams made things difficult...
 

I only quilted within the light strips with a light grey aurifil thread and tried out different fmq designs...

 
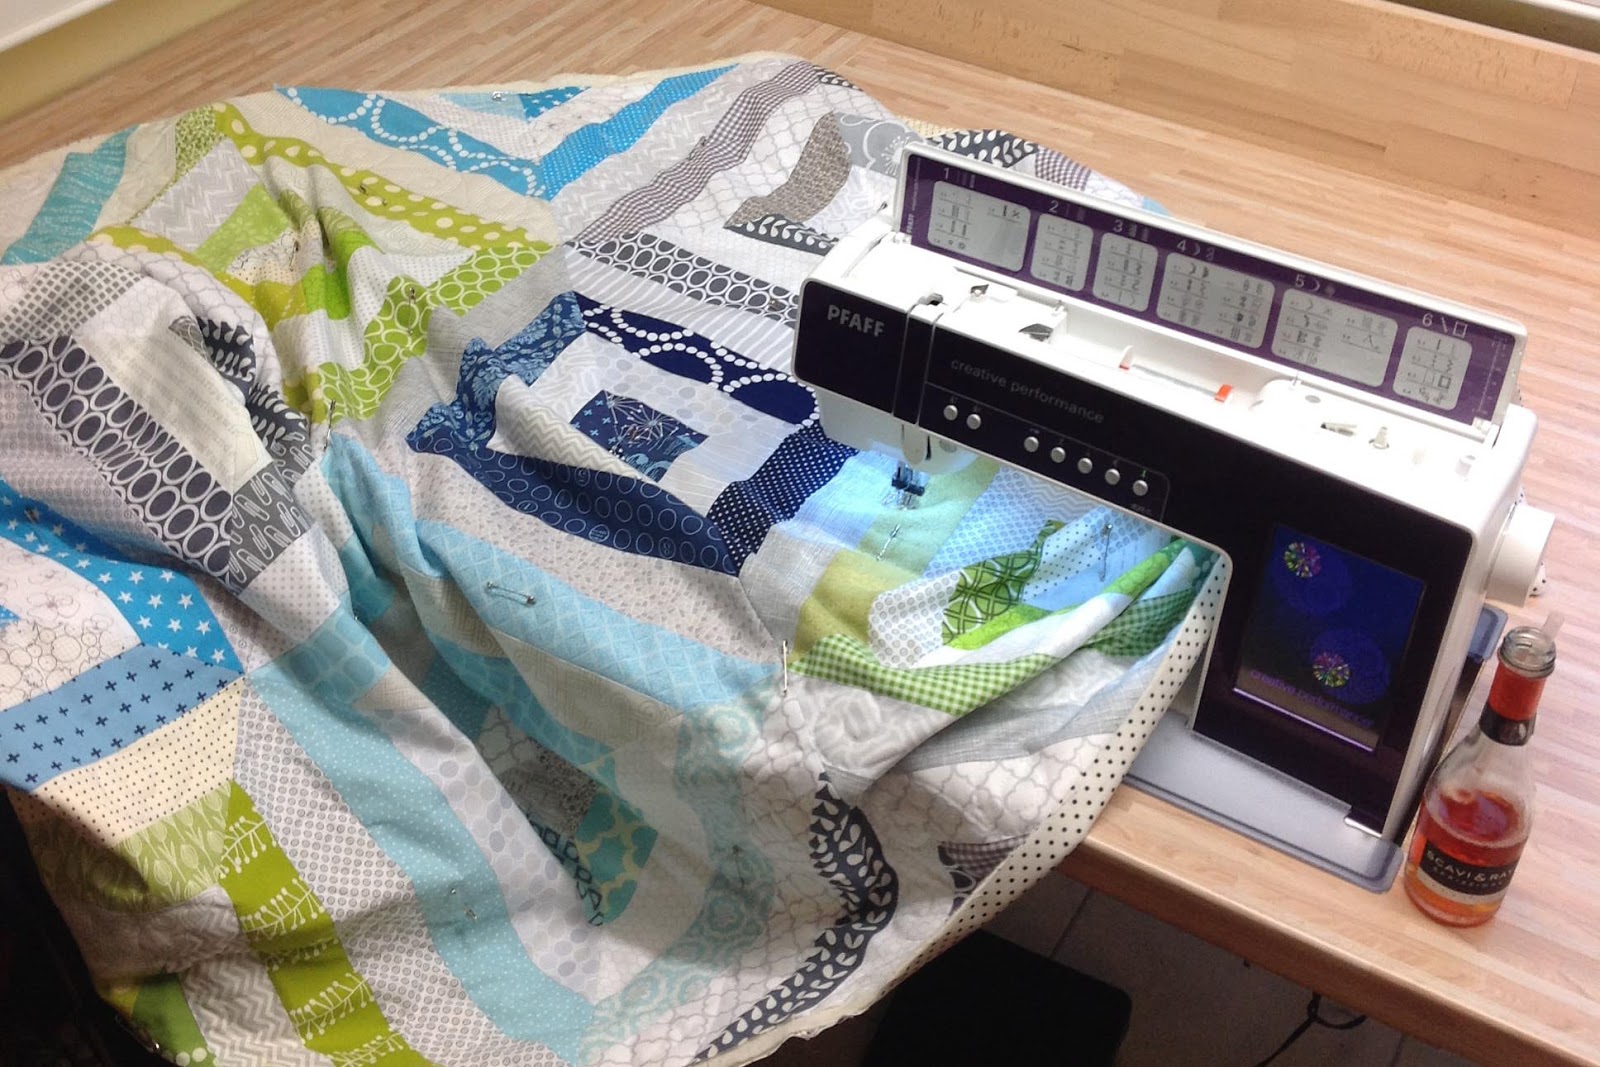
(oups, can you see how I kept myself going while struggling with the quilt...? What is you prefered beverage during fmq sessions?)
 

I tried waves...


... and leaves...


... and triple loop-de-loops...


... and feathers.

 
I added his name and used a scrappy low-volume binding, finished off with a triple-zig-zag-stitch.
 
 
And here it is... the first of the two quilts for brothers...
 

I'll be back with the second one shortly...
Happy quilting
Christine


Thursday, January 8, 2015

Oh Deer! Epic Fail.

This is an unusual blog post about a baby quilt that I made for my newborn niece (my first niece!). I devided a jelly roll of Momo’s Oh Deer! into boy-ish and girl-ish prints and used the majority of girl-ish prints for a stacked strips pattern. Everything went well until it reached quilt-top-stage.

Then I wanted to appliqué the name and things started to get out of control.

Karla Oh Deer Seam Ripper

Just so you know: doublecheck the direction of the letters before you fuse them to the background and before raw-edge-appliquéing them )o:

Maybe a hint that I chose the wrong font?!

Karla Oh Deer Quilt

I chose a piece of flannel and a left-over piece of batting that was just big enough and started quilting pebbles. Within the 2,5” strips I simply outlined the seams of every other strip.

Several thread breakes made quilting tough and enervating.

Karla Oh Deer Quilting

The binding was made from a mixture of white fabrics and leftover strips.

Karla Oh Deer Binding

When I finished quilting and binding, I popped the quilt in the washer like I do with all newly-made quilts.

This is the mess that came out of the washer together with the quilt. And another big ball of fibres came out of the dryer afterwards. It turns out the batting was a leftover from the other bearding quilt.

Karla Oh Deer Bearding

This phenomenon is known als “bearding”. The fibres of the batting penetrade the fabrics on both sides (top and backing). The more fibres you pull out the worse it gets.

I am so angry with whoever produced the batting (I threw away the packing before I finished the first bearding quilt) and I am angry with myself: I should have thrown away ALL the leftover batting pieces that I had when the batting ruined the first quilt.

I was so disappointed with the result that I even forgot to take a photo of the finished quilt before I gave it to my sister. I contemplated throwing it away but decided it could be used as a wall hanging, seeing it had hangers at the back.

I sincerely hope this will never ever happen to you!
Happy Quilting
Christine

Friday, July 5, 2013

Samples for London

Good news. The nametag is done and ready to be send out tomorrow. I’ll post photos once it arrived at my partner.

And the samples are washed and dryed (I had to rinse out the marks that helped me keep the quilting even).

Samples for London

Here’s a detail of the Dogwood Quilting.

Dogwood Comma

The fabrics are a pure linnen and my favourite fabric line ever: COMMA. In grey, black, white and green. I just hope my swap partners will like those baskets.

Tomorrow I’ll have a day off, the kids will stay at home (or go to the cinema) with my husband and I’ll head to our Modern Quilt Guild Sew-in. All day long. Yay!

Have a lovely weekend everyone!
Christine

Follow my blog with Bloglovin

Thursday, May 23, 2013

One year in blogland–a giveaway

Last year, on May 18th, I started blogging. Even if it soaks up much of my sewing time, I have never regretted that decision.

This last year brought some great changes.

  • I visited the Fat Quarterly Sewing Retreat in London.
  • Brigitte and I founded Modern Quilt Guild Bielefeld.
  • Our MQG is slowly growing and our meetings (twice per month) are very inspiring.
  • I entered an Online Bee (Sew-Euro—bee-an) and the list of blogs that I follow gets longer and longer.
  • some stats: I wrote 82 blog posts with 20463 views and 55 followers/ subscribers.
  • And the best is: I made some wonderful new acquaintances in blogland. In far-away-countries that I’ll probably never visit… in many parts of Europe… and even in Germany. Before I started blogging I only knew one other quilter in person. It is so much more fun sharing this passion with others than sewing alone.

The (online) quilting community is quite awesome, thanks for letting me join in the fun!

Mosaic 1 year blogiversary quilts

I don’t post regularly and sometimes I’d rather sew than write. So it might happen that you don’t read a syllable about me in weeks. I guess today is an appropiate moment to declare myself a Slow Blogger.

Thanks for bearing with me, dear friends and followers! I appreciate it very much that you still stop by and take your time to drop me a lovely comment.

Mosaic 1 year blogiversary other 

Now it’s time for a little giveaway.

I have often told you that COMMA by Zen Chic for Moda is my favourite fabric line of all times. To celebrate my 1-year-blogiversary I am giving away a large bag full of strips (as many as I can get into one big envelope). The strips are all 42” long and about 2,5” wide.

Comma Streifen grün weiß schwarz

Here’s another sneak peek (Thank you, Brigitte Heitland for sharing your COMMA strips with us!!!). They would make a great addition to your stash of strips if I dare say so…

Comma Streifen grau orange gelb

This is a giveaway for followers only (New followers, you are welcome, too). I want to thank you for your visits, your nice comments and the lovely way you welcomed me to blogland.

Let’s keep it simple. All you need to do is leave me a comment. Please make sure I have a way to contact you. I’ll draw a random winner on June 1st.

Good luck and thank you again!
Christine

Wednesday, May 15, 2013

New Zen Chic Quilt Patterns

I have been guest blogging again over at Brigitte’s Blog. I wrote a blog post introducing her seven brand new Zen Chic Patterns that she designed for her fabric collection “Barcelona” for MODA (due in stores Fall 2013).

Hop over to see the beautiful quilts she made for Portland and photos of her little elves who helped piecing the quilt tops.

Here’s a sneak peek of “my” quilt top(in wip state):

Sneak peek Barcelona

Happy Quilting!
Christine

Tuesday, May 7, 2013

New Zen Chic fabric line

In the last few weeks there has been some secret sewing going on over here. Spring Quilt Market is fast approaching and I have been helping Brigitte of Zen Chic to prepare for Portland. Her new fabric collection for Moda is “Barcelona” and I wrote a guest post on her blog today. Hop over to see the beauties she designed this time.

Here’s a sneak peek:

Happy Quilting!
Christine

P.S. there might be a little giveaway at the end of my guest blog post ;o)

Wednesday, November 14, 2012

Houston flimsy

This is the quilt top I made for Brigitte Heitland of Zen Chic for Fall Quilt Market in Houston. Her new fabric collection for moda is “Comma”. Using graphic designs with less depth then her first line.
I simply love this one!!!

Comma-Bundle-450

It was so much fun to play with these great fabrics and the pattern was another beginner-friendly one (o:

Here’s a photo of the work in progress:

Comma wip

And here’s the cover of her pattern:

Play a card

Her new fabrics are expected in stores in February 2013. I just long for those barcodes, tiny dots, circles and comma prints!!!

Happy Quilting!
Christine

Tuesday, November 13, 2012

There’s something I didn’t tell you…

Last spring, Brigitte Heitland of Zen Chic had mentioned that she had to sew 6 quilts for Spring Quilt Market within 2 weeks. As she only lives 20 Minutes from my home, I offered my help (kind of expecting that she would graciously decline seeing that I told her that I had only started quilting some months ago. And am self-taught/ internet taught.) BUT she accepted. I made a quilt top for her and she quilted it on her longarm maschine. Fun! Fun! Fun!

We met twice during these two weeks and we dreamed of founding a local Modern Quilt Guilt. We met again when all that Quilt Market Stress was over and then again and again and again. We have become good friends and founded Modern Quilt Guilt Bielefeld.

Much of this is already known to those who follow my blog for some months but I think I have never shown you the quilt top I made from her debut fabric line for moda: Juggling Summer.

JugglingSummer-bundle-450

A picture from the work in process:

DSC_0330

And a photo of the finished flimsy:

DSC_0346

And this is the cover she made for her pattern: Isn’t it great how her quilting really matches the design?! And the composition of her cover adds such a modern touch to the quilt!

Jelly Belly Quilt

The pattern is super easy – even for beginners like me. Well explained and easy to follow. I had no problems whatsoever understanding her directions.

It was so much fun to help making something that traveled to Quilt Market while I was staying home, that I offered my help for Fall Quilt Market again. Tomorrow I’m going to show you the flimsy I made for Houston.

Happy Quilting!
Christine

Saturday, September 22, 2012

Tutorial Fabric Baskets

O.k. I’m a bit slow but I finally finished my tutorial for easy Fabric Baskets. I’m going to add it to the “My Tutorials” site one day sooner or later, but in the meantime you can find it here:

Einzelkorb blogged

Supply list:
- basic sewing supplies (sewing machine, iron, fabric marker, scissors, rotary cutter, ruler, etc.)
- outer fabric, depending on size of your basket
- inner/ lining fabric, depending on size of your basket
- fusible batting, depending on size of your basket
- a round object to trace or compass

Supplies

1. Cutting
This fabric basket is made from a circle and a long rectangle.
First, decide on the size of the circle. Then you calculate the length of your rectangle. Remember what you learned in school? The cirumference of your circle is equal to 6,28 x radius of your circle. (Remember: 2 x pi x r) Some things you learned were really learned for life ;o) Oh, and add a generous seam allowance to your rectangle!
Choose height of your rectangle according to your needs.

2. Fuse your batting to the outer fabric. Follow manufacturer’s advice.

Fusing

3. Draw the circle onto your fabrics, either tracing a round shape or using your compass.

Circling

4. Cut out the cirles and the rectangles.

Cutting

5. Lay out your rectangles right sides together and sew along one long side.

right sides together

6. Open up and mark the centres of both raw long sides.

marking

7. Take your lining fabric circle and your lining rectangle and lay them out right sides together.

circle and rectangle

8.  Pin centre of rectangle to any point of your circle.

Centre pin

9. Pin all around the circle…

pinning

…until it looks like so:

pinned

10. Sew all around the circle, just remember to backstitch at the start and in the end to secure your seams.

sewing over pins

Make sure you finish your seam in the exact place where you started it. Like so:

finishing point

11. Repeat no. 7-10 and attach your outer fabric circle to your outer fabric rectangle. Afterwards it should look like this: a long tube with an open side.

tube

12. Sew from one end to the other, leaving an opening in the lining fabric.

pinned tube

13. Cut back your seam allowance to 1/2”, turn inside out and close the opening (by hand or using your sewing machine). You might want to stitch around the top edge of your fabric basket once but that’s really up to you.

Enjoy the variety of your new fabric basket (o;

Collage Juggling Brotkoerbe ed

Credits: Fabrics used in this tutorial: two prints of Juggling Summer from Zen Chic (Brigitte Heitland) for Moda.

Thanks for reading. If you do have any questions, please let me know in the comments, I’ll try to answer them asap.

Happy Sewing (o:
Christine

Sunday, July 15, 2012

Working on my FQSR Jelly Roll (Race) Quilt

As I didn’t finish my Jelly Roll (Race) Quilt at the Fat Quarterly Sewing Retreat in London, I am still working on it in between other projects. Here is what I did so far:

Jelly Roll Race Quilt Salt Air vor Planung

I did some planning in Photoshop and this is what I want it to look like in the end. I bought some pure off-white linen that is going to be my background fabric.

Jelly Roll Race Quilt Salt Air Planung

Now I need to do some maths to figure out how wide the inner background border has to be…

Happy Sunday everyone!
Christine
Related Posts Plugin for WordPress, Blogger...